
- admin
- May 6, 2021
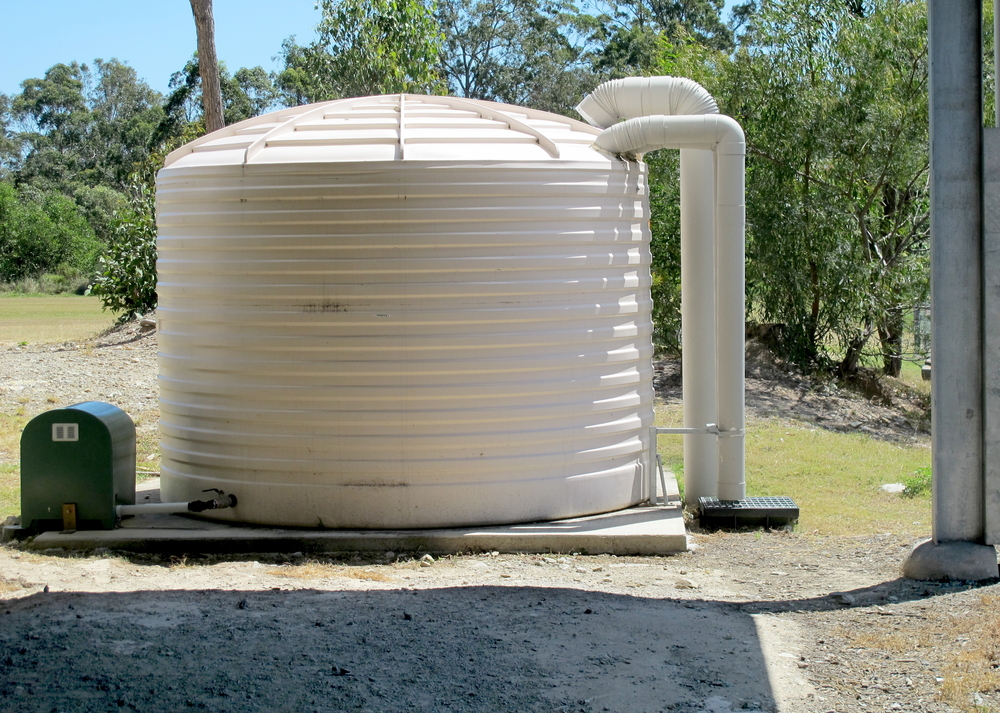
How to Install a Fiberglass Water Storage Tank?
After you’ve bought your fiberglass water tank, the next step to think about is how you’ll install it. To ensure that your fiberglass water storage tank is in a good condition, there are a few best practices to remember. You should also think about how you plan to use it. This affects the equipment you’ll need and whether you’ll be able to install it on your own.
What would your water storage tank be used for?
As previously mentioned, you must think about how you would use your tank before installing it. We’ve put together a handy list of what you can do with your new fiberglass water tank so you can easily figure out which class you are in.
- Garden and lawn watering
- Rainwater harvesting
- Swimming pool
- House appliances
- Livestock watering
Let’s look at the three-step method for installing your water tank if you’re going to use it for one of these purposes. Any, if not all, of these uses, necessitate attaching them to your house or shed roof in order to collect water.
Follow these 3 steps to install a water storage tank:
Installing a water tank is easy if you know what you’ll need it for. Here’s a short procedure that we found to be very simple to follow.
1) Prepare the tank base: For a water storage tank, you can prepare 2 types of bases – concrete and compacted material.
- Concrete Base: Pour a 3″ reinforced concrete slab that is level and smooth in all directions and is wider than the vertical tank’s diameter/base measurements. Before pouring the concrete, make sure the soil base is well compacted.
- Compacted Material: Create a 3″ pad of compacted crusher dust/road base with a diameter of at least 24″ wider than the water tank. Any rocks or stones, as well as any sharp or foreign matter that could harm the tank’s foundation, must be removed. This foundation must be compacted thoroughly to be perfectly level and flat in all directions. The outsides of the foundation must be protected by some kind of retaining wall to prevent erosion due to washout, vermin, or other factors.
2) Fit the overflow drainage pipe: Your fitting may already be installed if you purchased your fiberglass water tank from GSC Tanks (unless otherwise specified). The piping should then be linked to the storm water drainage system or brought to a point far enough away from the tank to avoid undermining the foundation.
3) Install your fill pipes from your roof: It’s now time to attach the pipe from your roof to the tank lid. If you plan to drink the water in your tank, talk to your local dealer about the filters you’ll need. It’s also crucial to check that your filter basket is securely fastened to the lid of your water tank.
Conclusion:
You’re ready to go now that you know how to install a fiberglass water storage tank. Please keep in mind that the recommendation given in step 3 is just a suggestion and not a mandatory requirement.
- fiberglass water storage tank
- fibreglass water tanks
Category
- Above Ground Fuel Tanks
- Above Ground Gas Storage Tank
- Above Ground Storage Tanks
- Above Ground Water Storage Tanks
- Agricultural Tanks
- Chemical storage Tanks
- Diesel Fuel Storage Tanks
- Diesel Storage Tanks
- Exernal FloatingRoof Tanks
- Farm Water Tank
- Fiberglass Oil Tanks
- Fiberglass Septic Tanks
- Fiberglass Tanks
- Fiberglass Underground Fuel Storage Tanks
- Field Erected Tanks
- Floating Roof Tank
- Food and Beverage Tanks
- Fuel tank
- Industrial Chemical Storage Tanks
- Industrial Gas Tanks
- Industrial Hot Water Storage Tanks
- industrial hot water tank
- Industrial Plastic Tanks
- Industrial Storage Tanks
- Industrial Tank heating pads
- industrial tanks
- Natural gas
- Natural gas vs Propane
- oil storage tank
- Oil Storage Tanks
- Peracitic Acid
- Petroleum Tanks
- Residential gasoline storage tanks
- Residential Water Storage Tanks
- Sodium Hydroxide Storage Requirements
- Sodium Hypochlorite Storage Tanks
- Steel Storage Tanks
- storage tank failure prevention
- Storage Tanks
- Sulfuric Acid Tanks
- Uncategorized
- UnderGround Storage Tanks
- Waste water tank
- Water Storage Tanks